YOLO全称是you look only once,是一种对象检测算法,详情可参考2016年原作者的论文:https://arxiv.org/abs/1506.02640;主要是实时目标检测,应用到很多方面,常见的比如道路监控、安防检测、物品计数等等。可以对图片或者视频中的目标快速检测,预测类型,确定区域坐标范围。
YOLO将物体检测作为一个回归问题进行求解,输入图像经过一次推断,便能得到图像中所有物体的位置和其所属类别及相应的置信概率,用整张图作为网络的输入,直接在输出层回归bounding box的位置和bounding box所属的类别。而不是像rcnn或fast cnn之类的需要将检测结果分为两部分(分类和位置)求解。
最初实现yolo的是darknet,对应github地址是https://github.com/pjreddie/darknet,持续到yolov3。之后也出现了用tensorflow和pytorch实现的版本,比如推到yolov5的:https://github.com/ultralytics/yolov5。
对于darknet,原作者比较久没有更新过了,不过还有另一个在持续更新到yolov4,并增加了windows的支持,做了不少调优,一般提到darknet可以用这个:https://github.com/AlexeyAB/darknet。
这些大神,都提供了训练好的数据集,用于常见物品,所以最重要的的是权重文件(比如对于v3来说,需要用到3个文件:coco.names,yolov3.cfg,yolov3.weights,weights文件提供大概九千多物品的检测大概245M的样子,也提供了轻量级tiny的weights文件,包含的物品较少),只要有weights文件,其实也可以用opencv来加载darknet,不必带有全部代码;还可以预先对自定义数据做训练用作自定义的场景。
1. 直接用darknet来试试目标检测。
先下载代码:
git clone https://github.com/AlexeyAB/darknet.git
v3或v4的配置文件需要单独下载。
下载完成后,进入目录并构建:
cd darknet
make
在当前目录下会生成新文件,我们可以指定配置文件运行它来检测图片:
./darknet detector test cfg/coco.data cfg/yolov4.cfg cfg/yolov4.weights
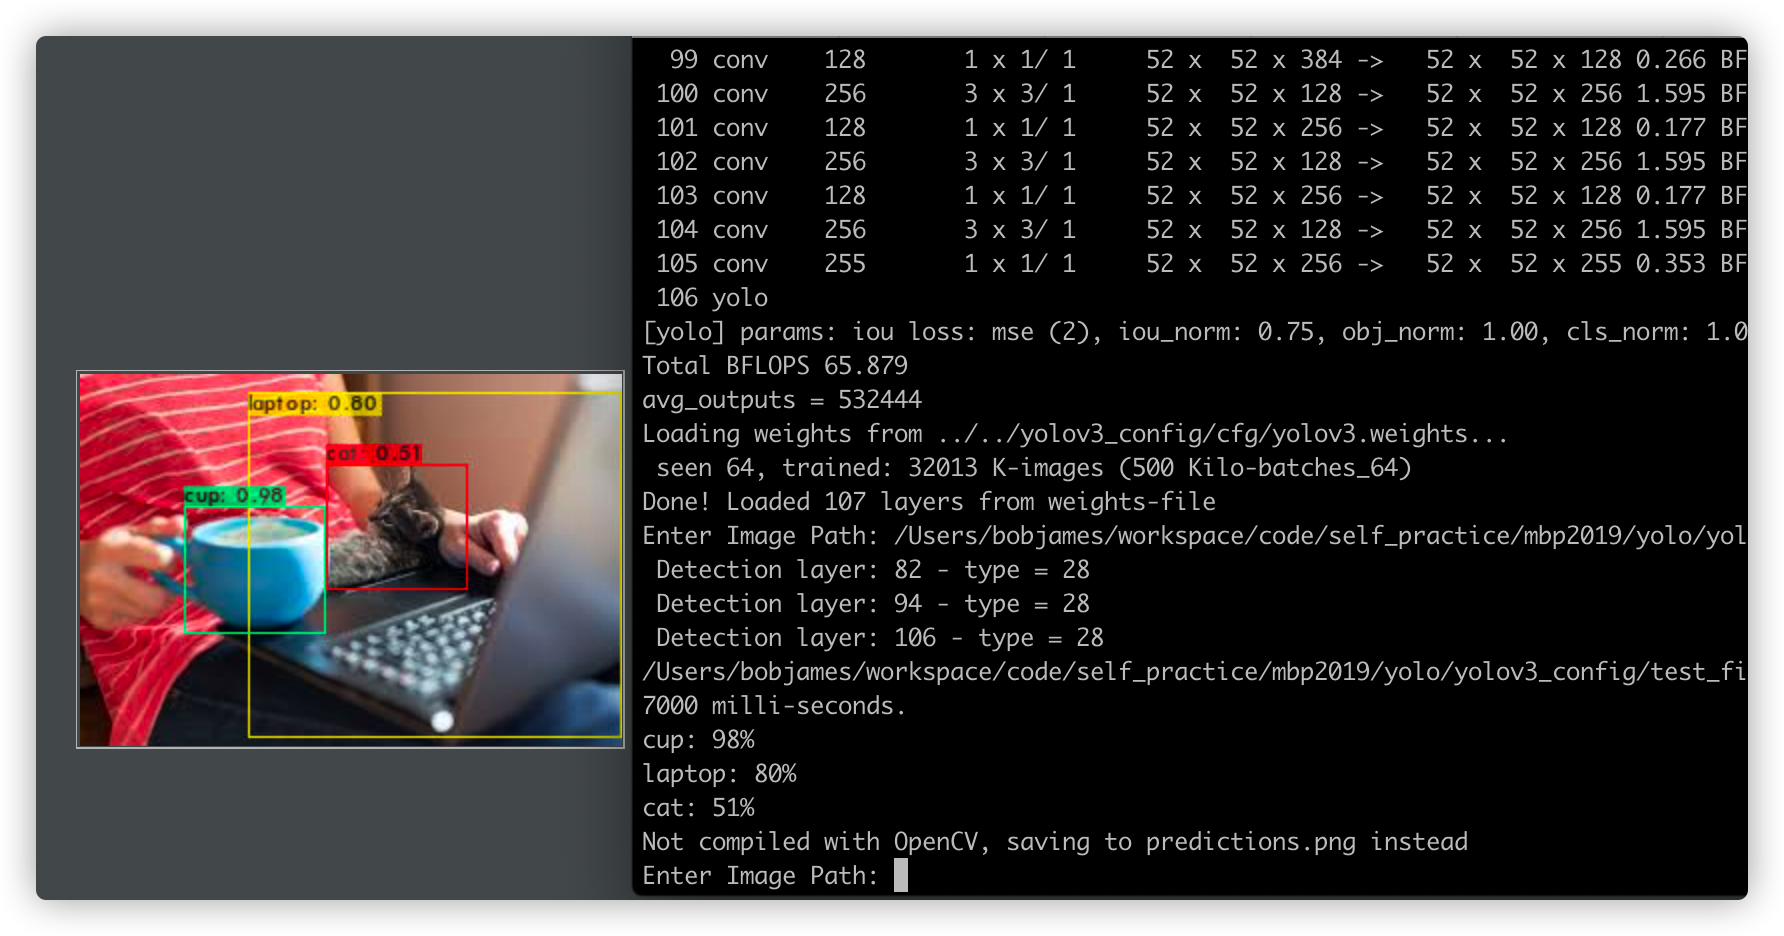
会看到如下的信息,可以不停地输入图片路径,并返回目标类型和可能性:
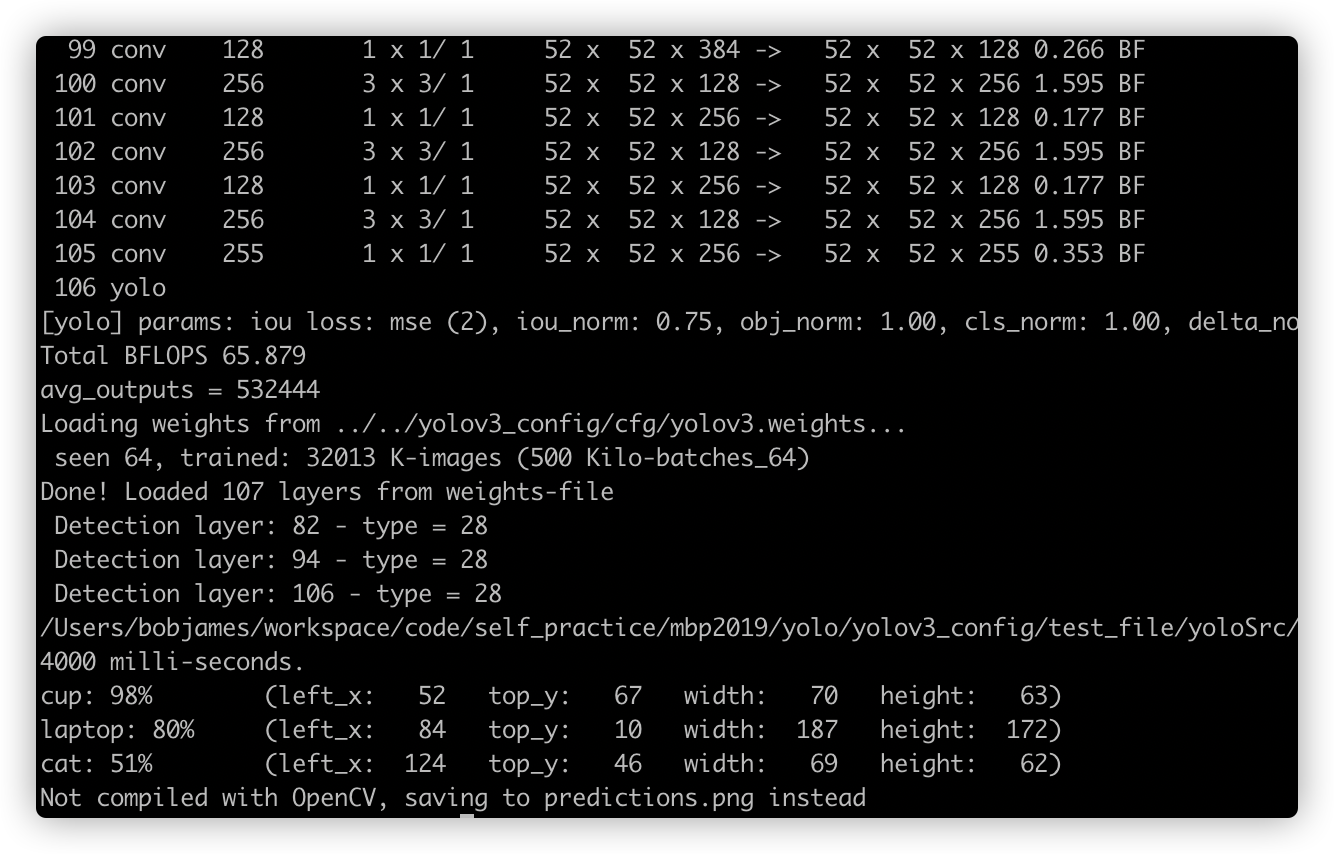
也可以直接指定图像路径,并输出坐标范围:
./darknet detector test cfg/coco.data cfg/yolov3.cfg cfg/yolov3_config/cfg/yolov3.weights -ext_output ../work.jpg
也可以用来检测视频中的对象:
./darknet detector demo cfg/coco.data cfg/yolov3.cfg cfg/yolov3_config/cfg/yolov3.weights -ext_output ../sample.mp4
如果遇到"Demo needs OpenCV for webcam images"的错误提示,意味着需要启用opencv,以mac为例,先安装上opencv
brew install opencv
装成功一堆东西后,再修改darknet的makefile,将OPENCV=0改成OPENCV=1,然后重新运行make,等待完成即可重新运行命令了。
2. 用opencv来加载weights文件做目标检测。
效果是一样的,可以对图片或者对视频实时检测,只是在用opencv加载weights文件。这里就通过电脑摄像头来实时检测吧。
用后面的代码,保存并运行,即可看到如下效果,当前是用摄像头实时检测:

import time
import os
import numpy as np
import cv2

def yolo_detect(label_path='./yolov3_config/cfg/coco.names',
                config_path='./yolov3_config/cfg/yolov3.cfg',
                weights_path='./yolov3_config/cfg/yolov3.weights',
                confidence_thre=0.5,
                nms_thre=0.3,
                jpg_quality=80):

    LABELS = open(label_path).read().strip().split("\n")
    nclass = len(LABELS)

    np.random.seed(42)
    COLORS = np.random.randint(0, 255, size=(nclass, 3), dtype='uint8')

    cap = cv2.VideoCapture(0)
    cap.set(3, 640)
    cap.set(4, 480)
    print(cap.get(3), cap.get(4))
    net = cv2.dnn.readNetFromDarknet(config_path, weights_path)
    while cap.isOpened():
        ret, img = cap.read()
        user_input = cv2.waitKey(1)
        if user_input == ord('q'):
            break
        else:
            (H, W) = img.shape[:2]

            print('Load yolo weights...')
            ln = net.getLayerNames()
            ln = [ln[i[0] - 1] for i in net.getUnconnectedOutLayers()]
            blob = cv2.dnn.blobFromImage(img, 1 / 255.0, (416, 416), swapRB=True, crop=False)
            net.setInput(blob)
            start = time.time()
            layerOutputs = net.forward(ln)
            end = time.time()

            print('Spend {:.2f} seconds to predict objects in current image...'.format(end - start))

            boxes = []
            confidences = []
            classIDs = []

            for output in layerOutputs:
                for detection in output:
                    scores = detection[5:]
                    classID = np.argmax(scores)
                    confidence = scores[classID]
                    if confidence > confidence_thre:
                        box = detection[0:4] * np.array([W, H, W, H])
                        (centerX, centerY, width, height) = box.astype("int")
                        x = int(centerX - (width / 2))
                        y = int(centerY - (height / 2))
                        boxes.append([x, y, int(width), int(height)])
                        confidences.append(float(confidence))
                        classIDs.append(classID)

            idxs = cv2.dnn.NMSBoxes(boxes, confidences, confidence_thre, nms_thre)

            print(boxes)
            print(confidences)
            print(classIDs)
            print(idxs)
            if len(idxs) > 0:
                for i in idxs.flatten():
                    (x, y) = (boxes[i][0], boxes[i][1])
                    (w, h) = (boxes[i][2], boxes[i][3])
                    color = [int(c) for c in COLORS[classIDs[i]]]
                    cv2.rectangle(img, (x, y), (x + w, y + h), color, 2)
                    text = '{}: {:.3f}'.format(LABELS[classIDs[i]], confidences[i])
                    (text_w, text_h), baseline = cv2.getTextSize(text, cv2.FONT_HERSHEY_SIMPLEX, 0.5, 2)
                    cv2.rectangle(img, (x, y - text_h - baseline), (x + text_w, y), color, -1)
                    cv2.putText(img, text, (x, y - 5), cv2.FONT_HERSHEY_SIMPLEX, 0.5, (0, 0, 0), 2)
                    print(text)
                    print((x, y), (x + w, y + h))

            cv2.imshow("show in real-time video capture", img)


if __name__ == '__main__':
    yolo_detect()
如果是用了yolov5,会生成pytorch的.pt文件,这个时候就不能用readNetFromDarknet,需要用readNetFromONNX。而这个onnx则需要从pt转换过来。
python models/export.py --weights yolov5s.pt --img 640 --batch 1
如果遇到错误提示'ONNX: export failure: No module named 'onnx''或'CoreML: export failure: No module named 'coremltools'',那么需要装两个library再次运行即可。
pip install onnx coremltools onnx-simplifier
如果在opencv加载onnx出现这样的错误提示的话:
    net = cv2.dnn.readNetFromONNX(weights_path)
cv2.error: OpenCV(4.5.1) /private/var/folders/nz/vv4_9tw56nv9k3tkvyszvwg80000gn/T/pip-req-build-39p1qqfs/opencv/modules/dnn/src/onnx/onnx_importer.cpp:1887: error: (-2:Unspecified error) in function 'handleNode'
> Node [Slice]:(171) parse error: OpenCV(4.5.1) /private/var/folders/nz/vv4_9tw56nv9k3tkvyszvwg80000gn/T/pip-req-build-39p1qqfs/opencv/modules/dnn/src/onnx/onnx_importer.cpp:731: error: (-2:Unspecified error) in function 'void cv::dnn::dnn4_v20201117::ONNXImporter::handleNode(const opencv_onnx::NodeProto &)'
> > Slice layer only supports steps = 1 (expected: 'countNonZero(step_blob != 1) == 0'), where
> >     'countNonZero(step_blob != 1)' is 1
> > must be equal to
> >     '0' is 0
>
那么将models下的comment.py中Focus类改成如下,再次export:
# 参考https://www.programmersought.com/article/21238500973/

class Focus(nn.Module):
    # Focus wh information into c-space
    def __init__(self, c1, c2, k=1, s=1, p=None, g=1, act=True):  # ch_in, ch_out, kernel, stride, padding, groups
        super(Focus, self).__init__()
        #self.contract=Conv(c1 * 4, c2, k, s, p, g, act)
        self.conv = Conv(c1 * 4, c2, k, s, p, g, act)

    def forward(self, x):  # x(b,c,w,h) -> y(b,4c,w/2,h/2)
        #return self.conv(torch.cat([x[..., ::2, ::2], x[..., 1::2, ::2], x[..., ::2, 1::2], x[..., 1::2, 1::2]], 1))
        N, C, H, W = x.size()  # assert (H / s == 0) and (W / s == 0), 'Indivisible gain'
        s = 2
        x = x.view(N, C, H // s, s, W // s, s)  # x(1,64,40,2,40,2)
        x = x.permute(0, 3, 5, 1, 2, 4).contiguous()  # x(1,2,2,64,40,40)
        y = x.view(N, C * s * s, H // s, W // s)  # x(1,256,40,40)
        return self.conv(y)
不过呢,亲自尝试后,发现onnx用opencv加载后会出现不少问题,没有weights文件用opencv加载方便,不确定是不是转换的问题。
不过可以用到yolov5的自带的detect的部分来获取识别到的类别以及坐标区域。
import cv2
import torch
import time

from models.experimental import attempt_load
from utils.datasets import LoadImages
from utils.general import check_img_size, increment_path, non_max_suppression, scale_coords
from utils.torch_utils import select_device, load_classifier, time_synchronized
from utils.plots import colors, plot_one_box

if __name__ == "__main__":
    weights_file = ""
    img_file = ""
    conf_thres = 0.25
    iou_thres = 0.45
    classes = None
    agnostic_nms = None
    max_det = 1000
    line_thickness = 3

    device = torch.device("cpu")
    model = attempt_load(weights_file, map_location=device)
    stride = int(model.stride.max())
    imgsz = check_img_size(640, s=stride)
    names = model.module.names if hasattr(model, 'module') else model.names
    dataset = LoadImages(img_file, img_size=imgsz, stride=stride)
    bs = 1
    vid_path, vid_writer = [None] * bs, [None] * bs
    t0 = time.time()
    for path, img, im0s, vid_cap in dataset:
        img = torch.from_numpy(img).to(device)
        img = img.float()
        img /= 255.0
        if img.ndimension() == 3:
            img = img.unsqueeze(0)

        t1 = time_synchronized()
        pred = model(img, augment=False, visualize=False)[0]
        pred = non_max_suppression(pred, conf_thres, iou_thres, classes, agnostic_nms, max_det=max_det)
        t2 = time_synchronized()
        for i, det in enumerate(pred):
            p, s, im0, frame = path, '', im0s.copy(), getattr(dataset, 'frame', 0)
            if len(det):
                det[:, :4] = scale_coords(img.shape[2:], det[:, :4], im0.shape).round()
                for *xyxy, conf, cls in reversed(det):
                    c = int(cls)
                    label = f'{names[c]} {conf:.2f}'
                    print("label: %s" % label)  #类别
                    print((int(xyxy[0]), int(xyxy[1])), (int(xyxy[2]), int(xyxy[3])))  #坐标区域
                    plot_one_box(xyxy, im0, label=label, color=colors(c, True), line_thickness=line_thickness)
            print(f'{s}Done. ({t2 - t1:.3f}s)')
            cv2.imshow(str(p), im0)
            while True:
                user_input = cv2.waitKey(3000)
                if user_input == ord('q'):
                    break
            cv2.destroyAllWindows()
文章评论 (0)